


WordPress is one of the most popular content management systems (CMS) for building websites, blogs, and online platforms. Traditionally, WordPress runs using a web server such as Apache or Nginx combined with PHP-FPM to process PHP requests.
However, there is another alternative for running PHP applications: FrankenPHP.
FrankenPHP is a modern PHP application server built on top of Caddy. It combines web server capabilities and PHP execution in a single application, eliminating the need for a separate PHP-FPM service. FrankenPHP also supports automatic HTTPS, HTTP/2, HTTP/3, and PHP worker mode.
In this tutorial, we will explain how to install WordPress with FrankenPHP on Ubuntu 24.04 LTS. The installation uses a native server environment without Docker, with MariaDB as the database backend.
Server Requirements
Before installing WordPress with FrankenPHP, make sure your server meets the following requirements:
- Ubuntu 24.04 LTS.
- Root or sudo access.
- A domain name pointing to your server’s public IP address.
- FrankenPHP installed and running.
- MariaDB Server installed and running.
- Internet connectivity.
- Ports 80 and 443 accessible through the firewall.
The recommended WordPress environment includes PHP 8.3 or newer, MariaDB 10.11 or newer, and HTTPS support.
In this tutorial, we assume FrankenPHP and MariaDB have already been installed and configured.
Update Ubuntu Packages
First, update the Ubuntu package list and upgrade the installed packages to their latest available versions.
sudo apt update
sudo apt upgrade -y
Install Required FrankenPHP Extensions
WordPress requires PHP extensions to communicate with the database, process images, handle compressed files, and perform other operations.
If FrankenPHP was installed using the Debian package repository, install the required extensions using the corresponding ZTS packages.
sudo apt install php-zts-mysqli php-zts-pdo-mysql php-zts-gd php-zts-intl php-zts-zip php-zts-opcache php-zts-imagick
Create a MariaDB Database for WordPress
WordPress requires a MySQL-compatible database to store website content, user information, settings, and other data.
Log in to MariaDB:
sudo mariadb -u root -p
Create a new database:
CREATE DATABASE geeks_db;
Create a dedicated database user:
CREATE USER 'geeks_user'@'localhost'
IDENTIFIED BY '3487*&jhjsdJH';
Grant database privileges to the WordPress user:
GRANT ALL PRIVILEGES ON geeks_db.* to 'geeks_user'@'localhost';
FLUSH PRIVILEGES;
EXIT;
The database configuration will be:
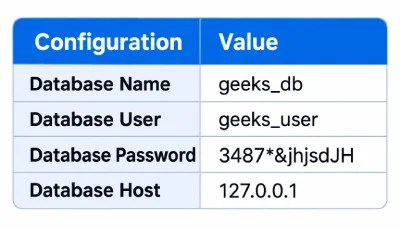
Using a dedicated database user is recommended instead of connecting WordPress directly with the MariaDB root account.
Download and Install WordPress
After preparing the database, download the latest WordPress package.
Create a directory for the WordPress source code
sudo mkdir -p /var/www/domainame
Download WordPress
wget http://wordpress.org/latest.tar.gz
Extract the downloaded archive
sudo tar -xvzf latest.tar.gz --strip-components=1 -C /var/www/domainname
Configure the user and group for the domain name directory
sudo chown -R www-data:www-data /var/www/domainname
Set WordPress file and directory permissions
sudo find /var/www/domainname -type d -exec chmod 755 {} \;
sudo find /var/www/domainname -type f -exec chmod 644 {} \;
Configure FrankenPHP for WordPress
Now configure FrankenPHP to serve the WordPress website.
Create a new directory for WordPress virtualhost configuration
sudo mkdir /etc/caddy
Create a Caddyfile file containing the WordPress virtualhost configuration script
sudo nano /etc/caddy/Caddyfile
Enter the virtualhost script below into the Caddyfile field
sudo nano /etc/caddy/Caddyfile
domainame {
    root * /var/www/domainname

    php_server

    file_server
}
Explanation of the Configuration
- domainname: Defines the domain name served by FrankenPHP.
- root *: Specifies the WordPress installation directory.
- encode zstd br gzip: Enables response compression.
- php_server: Enables PHP processing and static file serving.
- log: Enables request logging.
The php_server directive is particularly important because it handles PHP execution and provides the routing behavior required by WordPress.
FrankenPHP’s built-in PHP server also supports the standard front-controller routing pattern used by WordPress.
Change the user and group from the caddy directory
sudo chown -R root:root /etc/caddy
Validate the Caddyfile virtualhost configuration
sudo frankenphp validate --config /etc/caddy/Caddyfile
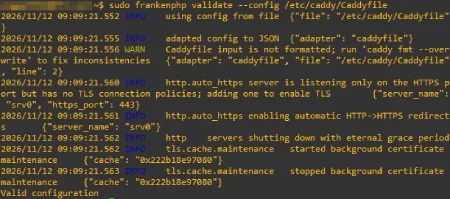
Restart the FrankenPHP service
sudo systemctl restart frankenphp.service
WordPress CMS Setup
To set up WordPress, access https://domainname in your browser, Click Let’s Go

Enter the database name, username, and password information that you created previously, Submit

Click Run the Installation to begin the WordPress installation

Enter the site title, username, password, and email. Clik Install WordPress

WordPress installation successful, Click Log In
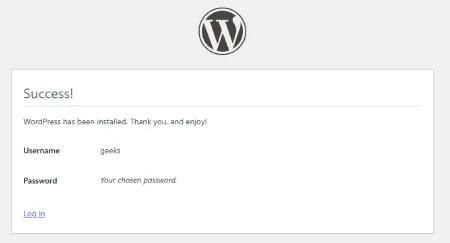
Enter the username and password for the WordPress admin user, Click Log In

Conclusion
Installing WordPress with FrankenPHP on Ubuntu 24.04 LTS provides an alternative to the traditional Apache or Nginx and PHP-FPM architecture.
FrankenPHP combines Caddy and PHP into a single application server, simplifying the deployment of PHP-based websites while providing modern web technologies such as automatic HTTPS, HTTP/2, HTTP/3, and response compression.
By following this tutorial, you have configured MariaDB, installed WordPress, configured FrankenPHP using a Caddyfile, and completed the WordPress installation through a web browser.
With the right server configuration, security practices, and regular maintenance, FrankenPHP can serve as a modern foundation for running WordPress websites on Ubuntu 24.04 LTS.


